
ActionfigurejunkiesCall (951) 219-6582

Level 4 and Level 5, Riverside

Most Walls Need Level 4. Some Walls Will Punish You For It.

Drywall taper skim coating a wall joint on a Riverside, CA remodel

The difference is one skim coat over the whole board, and whether you need it comes down to where the light lands and what paint is going on top. We will tell you which one your job is before we quote it.

  • Hang, tape and finish
  • Texture matched on repairs
  • Licensed and insured

Finish Notes

Plain writing about board, mud and the finish level nobody explains to you.

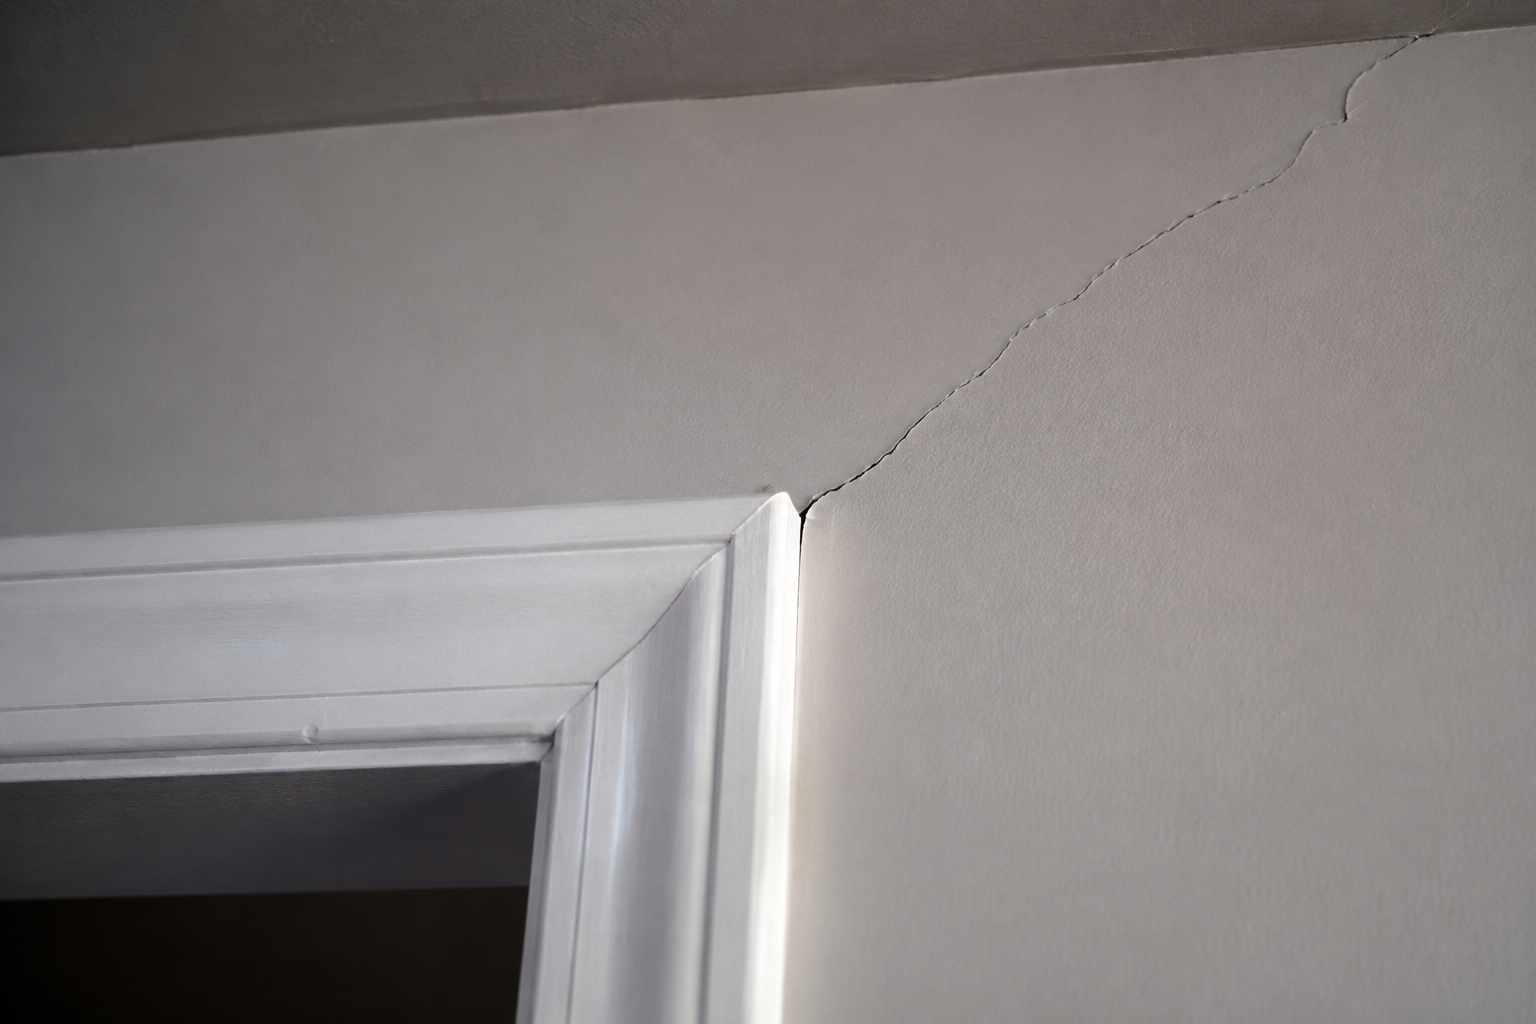
Diagonal settlement crack running up from the top corner of an interior door frame in Riverside, CA

Five Kinds of Drywall Damage and Which Ones Need a Repair Crew

Drywall damage is one of the few household problems where the visible size of the fault tells you almost nothing about how serious it is. A four inch hole from a doorknob is trivial. A hairline crack the width of a pencil line running diagonally from a window corner can mean the house is moving. Learning to tell them apart is genuinely useful, because it decides whether you spend an afternoon and twenty dollars or make a phone call.

What follows is the five categories that account for nearly all residential drywall damage, what each one actually means, and where the line sits between a homeowner job and a trade job. Read it before you search for anyone to repair drywall near me, because two of the five categories are genuinely worth doing yourself and one of them is a structural question wearing a cosmetic disguise.

One. Nail pops and screw pops

These look like small round bumps or discs, often with a hairline ring around them, appearing in rows up a wall or across a ceiling. The fastener holding the drywall to the framing has backed out slightly, pushing the compound above it off the surface.

The cause is almost always the framing drying and shrinking. Lumber arrives with moisture in it, gives that moisture up over the first year or two, and shrinks across the grain as it does. The fastener stays where it is relative to the drywall while the wood moves, and the head ends up proud.

This is genuinely benign. A scattering of nail pops in a house a couple of years old is normal and expected. It is also the easiest repair on this list. The correct method is not to hammer the nail back, which achieves nothing lasting, but to drive a new screw an inch or two away into the same framing member, then remove or set the offending fastener, then fill both.

Anybody who is reasonably handy can do this. The only common mistake is over filling, which produces a visible mound that catches light forever.

Two. Cracks, and the two kinds

Cracks are where the diagnosis actually matters, because two things that look similar have completely different meanings.

Seam cracks run along the joints between sheets, so they appear as long straight lines, usually vertical or horizontal, sometimes with the paper tape visibly lifting. These are a finishing or movement problem in the drywall itself. Common causes are tape that was applied over insufficient compound and never bonded, seasonal humidity movement, and ordinary building settlement. They are cosmetic and fixable.

The repair is to cut out the failed tape entirely rather than fill over it, re tape with mesh or paper, and refinish. Filling over loose tape is the most common mistake and it fails within a year every time.

Stress cracks run diagonally, and they start at the corners of openings. A crack running up and out from the top corner of a door or window is the classic. This is where the sheet is weakest, and it is where movement in the structure concentrates.

A single small diagonal crack at one door corner in an older house is usually nothing more than normal movement. Several of them, in the same direction, growing over time, accompanied by doors that have started sticking or floors that have developed a slope, is a different conversation. In parts of inland Southern California where expansive soils and seasonal moisture swings are common, foundation movement is a real phenomenon and drywall is frequently the first place it becomes visible.

The rule is straightforward. Patch a crack, mark the date, and look at it in six months. A crack that stays closed was movement that has finished. A crack that reopens in the same place is telling you the structure is still moving, and repairing the drywall again is treating a symptom.

Three. Holes

Holes divide by size and the divide is at about six inches.

Small holes, up to roughly the size of a doorknob strike, are handled with a self adhesive mesh patch or a California patch, and are a straightforward homeowner job. The finished result depends almost entirely on how wide the compound is feathered and how well the texture is matched afterward, which is the part people underestimate.

Larger holes need a backing and a piece of new board. The correct method is to cut the opening to a clean rectangle, ideally out to the centers of the studs on each side so the new piece has something to fasten to, or to add wood backing behind the existing board if cutting to studs is impractical. Then a new piece, screwed, taped on all four sides, and finished in three coats over a span wide enough that the patch is not a visible plateau.

The point at which people call somebody is usually the finishing rather than the carpentry. Fitting the board is easy. Making it disappear is not.

Before cutting into any wall, check what is behind it. Electrical cable, plumbing and gas lines all run in walls, and a reciprocating saw plunged into a wall cavity is how a small repair becomes an expensive one.

Four. Water damage

Water damage is the category where the visible mark is the least useful part of the information. A brown stain on a ceiling is not the problem. It is a record of where water ended up, and the source is frequently several feet away and higher.

The critical distinction is whether the board is still structurally sound. Drywall that got damp and dried, and is still firm and flat, can often be sealed with a stain blocking primer and repainted. Drywall that is soft, crumbling, sagging, or has lost its bond between the paper and the core is finished and has to come out. Pressing on it with a thumb tells you within a second which one you have.

Anything beyond a small isolated stain deserves professional attention for two reasons that have nothing to do with the drywall. The first is that the leak has to be found and stopped, and the water arriving at a ceiling stain frequently entered the building somewhere else entirely. The second is what is behind the board. Wet cavity insulation stays wet for a very long time, and wet framing plus warm conditions grows mold within about forty eight hours. A stain that gets painted over with a sealed cavity behind it becomes a much larger problem quietly.

Anyone searching for someone to repair drywall near me after a leak should be prepared for the answer to involve opening more of the wall than the stain suggested, and should be suspicious of anyone who proposes to simply prime and paint it without looking behind.

Five. Corner bead damage

Outside corners take physical abuse from furniture, vacuum cleaners, luggage and traffic, and the metal or vinyl bead underneath dents or separates. The compound over it cracks off in flakes and the corner ends up ragged.

Small dents in the compound over an intact bead fill easily. A bead that has actually been bent or pulled loose has to be cut out and replaced, because compound applied over a loose bead will crack off again at exactly the same rate.

The replacement is not difficult but it does need the bead to be properly fastened and set true, and the finishing along a corner is unforgiving because the eye follows a straight line and sees any deviation in it.

The dividing line

The honest summary is that the carpentry side of drywall repair is accessible to most homeowners, and the finishing side is a skill that takes real practice. Cutting a rectangle and screwing in a patch is easy. Feathering compound over a wide enough area, sanding without gouging, and matching a texture so the repair vanishes is the part professionals get paid for.

Call somebody when the damage is water related, when a crack keeps returning, when the repair is on a ceiling, when the wall has a texture that has to be matched, or when the area is large enough that a visible patch would be worse than the original damage. Handle nail pops, small holes and minor corner dings yourself, and take the time to build the compound out wider than feels necessary, because that single habit is what separates a repair you can see from one you cannot.

Read the full article
Level 4 or Level 5 Drywall Finish, and How to Tell Which One Your Riverside Room Needs

Level 4 or Level 5 Drywall Finish, and How to Tell Which One Your Riverside Room Needs

Most homeowners find out that drywall has finish levels after the painting is done and something looks wrong. That is a bad time to learn it, because by then the decision has already been made for you by whoever quoted the job cheapest, and undoing it means going back over a finished, painted wall.

So here is the whole thing laid out before you need it.

There Are Six Levels and You Only Care About Two

The finish level system is an industry specification that runs from level 0 to level 5. Level 0 is board hung with nothing done to it, which is what you leave when a room is going to be gutted again soon. Levels 1 and 2 are partial: tape embedded, maybe one coat, used in attics, above ceilings, in warehouses and behind tile. Level 3 is a step short of paint ready and gets used under heavy textures in commercial work.

For a house that somebody is going to live in and look at, the argument is only ever between level 4 and level 5.

Level 4 is joints and inside corners taped and covered with two separate coats of joint compound, corner bead covered with three, and every fastener head coated three times. Then it is sanded flat. This is the standard finish for residential interior walls and it is what the great majority of houses in Riverside have.

Level 5 is everything in level 4, plus a thin skim coat of compound applied across the entire wall surface, sanded, and primed. Nothing about the joints changes. What changes is that the whole wall becomes one material instead of two.

Why “One Material Instead of Two” Matters

A level 4 wall is flat. Run your hand over it and you feel nothing at the joints. Hold a straightedge on it and it sits true. As a physical surface it is finished.

But roughly eighty percent of that surface is the paper facing of the drywall sheet, and the rest, the joints and the corner runs and every little circle over a screw, is dried joint compound. Paper and compound do not absorb paint at the same rate. Compound is more porous and drinks more of it. Paper holds it nearer the surface.

Roll a coat of paint over both and, once it dries, the areas over compound end up a fraction duller than the areas over paper. On most walls in most light you will never notice. In the wrong light, with the wrong sheen, you will notice constantly and you will not be able to stop noticing.

Painters call it flashing, or joint banding. It shows up as slightly dull stripes running vertically and horizontally across an otherwise perfect wall, and dull spots in rows where the screws are. People assume the paint was applied badly or the wall was taped badly. Usually neither is true.

The Riverside Part of This

The condition that exposes a level 4 wall is raking light. That is light travelling along the surface at a shallow angle rather than hitting it square. It is not a coincidence that raking light from a work lamp is the standard way a finisher inspects his own work: it is the harshest possible test of a flat surface.

Riverside serves it up for free. We are inland, the air is dry and clear for most of the year, and the afternoon sun drops low and stays bright for hours. A west facing living room with a big slider takes low direct sun across its side walls for a long stretch of every clear afternoon, and clear afternoons are what we mostly have.

Add the way houses get built here. A lot of the tract stock from the last thirty years has open plan great rooms with long uninterrupted walls, two story entries, and stairwells lit from a high window. Those are exactly the surfaces where the eye reads the whole plane at once and picks up any variation across it.

Older parts of town behave differently and are worth knowing about. The Wood Streets and the houses along Victoria Avenue often have plaster over lath rather than drywall, smaller rooms, deeper eaves and more window divisions. Sun gets broken up before it reaches a wall, and the wall it reaches is usually already textured or troweled. Those houses rarely need a skim on a repair. The nineties and two thousands tract houses on the flats are the ones where the question comes up.

The Sheen Question

Paint sheen is the second half of the equation and it is the half you still control after the drywall is finished.

Flat and matte paints have very little binder shine to them. Light hits them and scatters in every direction, which is why a matte wall hides so much. Eggshell reflects a little more. Satin more again. Semi gloss is genuinely reflective.

The more a paint reflects, the more faithfully it reports the surface underneath it. A level 4 wall under a flat paint in a bedroom is invisible. The same wall under a satin paint in the same room will show its joints.

Colour plays into it too. A deep saturated colour carries more pigment and more binder, dries with more sheen than a pale version of the same paint, and shows differences in absorption far more clearly. Dark grey and deep blue walls are unforgiving in a way that off white simply is not.

How to Decide, Before Anyone Quotes You

You can do this yourself in ten minutes and it will save you an argument later.

Go into the room in the late afternoon on a clear day. Do not look at the wall. Stand at one end of it and look along it, with your eye close to the plane of the surface, in the direction the light is coming from. That is the view that finds every defect.

Then ask three questions. Does light rake along this wall for any real part of the day? Is the paint going to be anything shinier than a matte or a flat? Is this a large unbroken plane with no windows, doors or cabinets to interrupt it?

One yes is usually enough to justify a skim on that wall. Two or three and it is not really a question.

If all three are no, level 4 is correct and buying level 5 is buying something you will never be able to see.

The Textured Wall Exception

Here is the part that saves most people money, and it applies to a large share of Riverside housing.

If the wall is getting a sprayed texture, orange peel or knockdown, level 5 is pointless. Texture is a deliberately randomised surface. Every one of those little peaks and flattened splats scatters light in its own direction, which destroys the smooth reflection that would otherwise make a joint visible. You cannot see joint banding through a knockdown finish because the finish is doing the same job the skim coat would have done, and doing it for less money.

Skimming under texture is like sanding a floor you are about to carpet. If a contractor quotes you level 5 under knockdown, ask him to explain what it is for.

What It Costs and Where the Money Goes

Hanging and taping cost about the same whichever way you finish. The skim is additional labour and additional material over the entire square footage of the room, plus a lot more sanding, plus a primer coat.

In practice it tends to add somewhere in the region of sixty cents to a dollar ten per square foot of surface, moving with ceiling height, how much cutting in there is around windows and doors, and how good the level 4 underneath it is.

That is not a trivial number across a whole house. It is a very reasonable number across the two rooms that actually need it. Nobody says you have to buy one specification for every wall in the building, and we quote it room by room for exactly that reason.

If You Have Already Painted and It Looks Wrong

This happens and it is fixable, just not cheaply.

Confirm the diagnosis first. Kill the overhead light, hold a bright work lamp flat against the wall at one end, and look along the surface. If the pattern you see follows the tape lines and the screw rows, you are looking at flashing and the wall is a level 4 under too much sheen.

Two ways out. The cheap one is to repaint in a flatter sheen, which often reduces it enough to live with, and costs a fraction of the alternative. The thorough one is to skim the wall to level 5 over the existing paint, prime and repaint, which fixes it properly and permanently.

Which one is right depends on how much the wall bothers you and how long you plan to be in the house. We will look at it and tell you honestly, including telling you that a can of flat paint will probably do, when it will.

The Short Answer

Most Riverside walls need a properly executed level 4 and nothing more. A minority, the flat ones in hard afternoon light wearing a paint with some shine to it, need level 5 and will look wrong forever without it.

The only thing that decides it is where the light falls and what is going on top. Not the size of the house, not the budget, and not what the contractor prefers to sell.

If you want a second opinion on a room before you commit, call (951) 219-6582 and describe the light and the paint. That conversation is short and it is free.

Read the full article

Board, Tape and the Finish Level to Match

We hang, we tape, we texture, and we say out loud which level the room needs before anyone signs anything.

01New Drywall, Hung and Finished
Additions, garage conversions and whole remodels. Half inch board on walls, five eighths on ceilings and on anything spanning two feet across the framing, screwed to a proper pattern and finished to the level the room calls for.
02Level 5 Skim Coating
A thin coat of compound over the entire surface after the joints are finished. For flat painted walls in raking light, for gloss and semi gloss paint, and for large uninterrupted planes like a stairwell or an open great room.
03Texture Matching on Repairs
Orange peel and knockdown are sprayed, and the pattern varies by nozzle, air pressure and how long the mud sat before it was knocked down. We shoot a sample board, hold it against the existing wall, and adjust until it disappears.
04Garage Firewall Board
Type X on the wall between the garage and the house, and on the ceiling where there is living space above. It is a code item and an inspection item, and it is the one place where board thickness is not a preference.
05Ceiling Repair and Popcorn Removal
Nail pops, water stained board, cracked corners. On anything built before the early eighties we recommend testing the popcorn before it is disturbed, because the answer changes who is allowed to touch it.
06Patching After Other Trades
Electrical, plumbing and HVAC leave holes. We cut them back to something square and supported, board them, finish them, and match the texture so the wall does not tell the story afterwards.

Actionfigurejunkies hangs and finishes drywall in Riverside. Additions, garage conversions, whole house remodels, ceiling repairs, and the awkward patch that three other people have already tried. We work out of the Victoria Ave area and cover the city and the near valley.

The question we ask on every walkthrough before we talk about price is what finish level the job actually needs. Level 4 is the standard for a painted wall in a house: tape coat, two coats over the fasteners and joints, sanded flat, then texture and paint. Level 5 adds a thin skim over the entire surface so the paper face and the compound absorb paint identically. That skim is real work and real money, and on a textured wall in a tract house it buys you nothing at all.

Where it stops being optional is a flat wall in strong side light, and Riverside has more of those than most places. West facing rooms take hard low sun through the back half of the afternoon for most of the year. Put a satin or eggshell paint on a level 4 flat wall in that light and every joint and every screw line reads as a shadow. People blame the painter. It is almost never the painter.

  • Level 4 is not a lesser jobIt is the correct specification for a textured, flat painted wall, which is most of what gets built here. Paying for level 5 under a knockdown texture is money burned.
  • Light decides it, not budgetRaking light across a flat wall is the whole test. Walk the room at four in the afternoon before you choose. If the wall is going to be lit that way, skim it.
  • Gloss and dark colors raise the barSatin, semi gloss and deep saturated colors all reflect more and hide less. The flatter the sheen and the lighter the color, the more forgiving the wall.

What Each Finish Level Adds to the Bill

Board and hanging cost roughly the same whichever way you finish. The finish level is where the number moves, and it moves by a lot less than most people expect.

Level 4, Hung and Finished$2.10 to $2.90 per sq ftLevel 5 Skim Addedadd $0.60 to $1.10 per sq ftRepair and Texture Match$260 to $850 typical
  • Correct for textured painted walls
  • Tape coat plus two, sanded flat
Get a number
  • Full surface skim over the joints
  • For flat sheen, gloss or raking light
Get a number
  • Cut back, backed and boarded
  • Sample board shot before we spray
Call now

Riverside Neighborhoods We Hang Board In

The finish level conversation changes street to street, because the housing stock does. Postwar plaster and lath in the Wood Streets asks different questions than a nineties tract off Alessandro.

  • Riverside, CA (92501, 92503, 92506, 92507, 92509)
  • The Wood Streets
  • Victoria Avenue and Arlington Heights
  • Canyon Crest
  • La Sierra
  • Rubidoux and Jurupa Valley

Call (951) 219-6582. If you are calling about a patch, take a photo with a lamp held close to the wall and off to one side. That tells us more than a straight on shot ever will.

Questions About Finish Levels

What actually separates level 4 from level 5?
One more pass, over everything. Level 4 finishes the joints, the inside corners and the fastener heads with a tape coat and two coats of compound, then sands them flat. Level 5 takes that finished wall and skims a thin layer of compound across the entire face, so the paper and the compound present one continuous surface to the paint. Level 4 leaves you a flat wall with two different materials on it. Level 5 leaves you a flat wall with one.
So which one does my house need?
Stand in the room in the afternoon and look along the wall rather than at it. If light rakes across a large flat plane and the paint is going to be anything shinier than a matte, skim it. If the wall is getting orange peel or knockdown texture, or it is a bedroom with light coming in square, level 4 is the right call and the skim is wasted money. That is genuinely the whole test.
Is level 5 worth the extra on a normal tract house?
Usually not, and we will say so. Most Riverside tract housing gets a sprayed texture, and texture is very good at breaking up reflected light. Skimming under knockdown is like polishing a floor before you carpet it. The rooms where we do push for it are open plan great rooms, stairwells, and any long flat wall on the west side of the house.
The painter says my walls are bad. Are they?
Sometimes, and sometimes the wall was finished correctly to a level that was never going to work with the paint chosen. Flashing, where the joints and screw lines show as dull or shiny patches through the paint, is the classic symptom of a level 4 wall under a sheen that needed level 5. The fix is a skim coat and a repaint, not an argument about workmanship.
Can you match my existing knockdown texture?
Usually close enough that you will lose it once the paint is on, but it is a skill and it is not instant. The pattern depends on the hopper nozzle, the air pressure, how thin the mud is mixed and how many minutes it sat before it was knocked down. We spray a sample board, hold it up against the wall in the same light, adjust and shoot again. Anyone who sprays straight onto your ceiling without doing that is guessing.
How long does the mud take to dry out here?
Faster than the bucket says, which is a mixed blessing. Riverside summers are hot and dry and the inland air pulls water out of joint compound quickly, so we can often coat the same day rather than waiting overnight. The risk is the other side of that. Mud that dries too fast can crack in a wide joint or over a deep fill, so on heavy fills we mix a little wetter, work smaller sections and let the fill go off in stages rather than chasing the schedule.

Tell Us How the Light Hits That Wall

Before you get quotes, walk the room in the late afternoon and look along your walls rather than at them. Then call and describe what you saw, along with the paint sheen you have in mind. That conversation takes five minutes and it decides whether you are buying a level 4 job or a level 5 one, which is the single biggest variable in what drywall costs you.